Swagger
Based on the latest OpenAPI 3.0.3, the new version of Swagger components is implemented.
Related information:
| Description | |
|---|---|
| Can be used for standard projects | ✅ |
| Can be used for Serverless | ❌ |
| Can be used for integration | ❌ |
| Contains independent main framework | ❌ |
| Contains independent logs | ❌ |
Installation dependency
$ npm install @midwayjs/swagger@4 --save
$ npm install swagger-ui-dist --save-dev
If you want to output Swagger API pages on the server, you need to install the swagger-ui-dist into the dependency.
$ npm install swagger-ui-dist --save
Or reinstall the following dependencies in package.json.
{
  "dependencies": {
    "@midwayjs/swagger": "^4.0.0",
    // If you want to use it on the server
    "swagger-ui-dist": "4.2.1",
    // ...
  },
  "devDependencies": {
    // If you don't want to use it on the server
    "swagger-ui-dist": "4.2.1",
    // ...
  }
}
Open the component
Add components to configuration.ts.
import { Configuration } from '@midwayjs/core';
import * as swagger from '@midwayjs/swagger';

@Configuration({
  imports: [
    // ...
    swagger
  ]
})
export class MainConfiguration {

}
You can configure the enabled environment, for example, the following code refers to "only enabled in local environment".
import { Configuration } from '@midwayjs/core';
import * as swagger from '@midwayjs/swagger';

@Configuration({
  imports: [
    // ...
    {
      component: swagger
      enabledEnvironment: ['local']
    }
  ]
})
export class MainConfiguration {

}
Then start the project and access the address:
The path can be configured by swaggerPath parameters.
Data type
Automatic type extraction
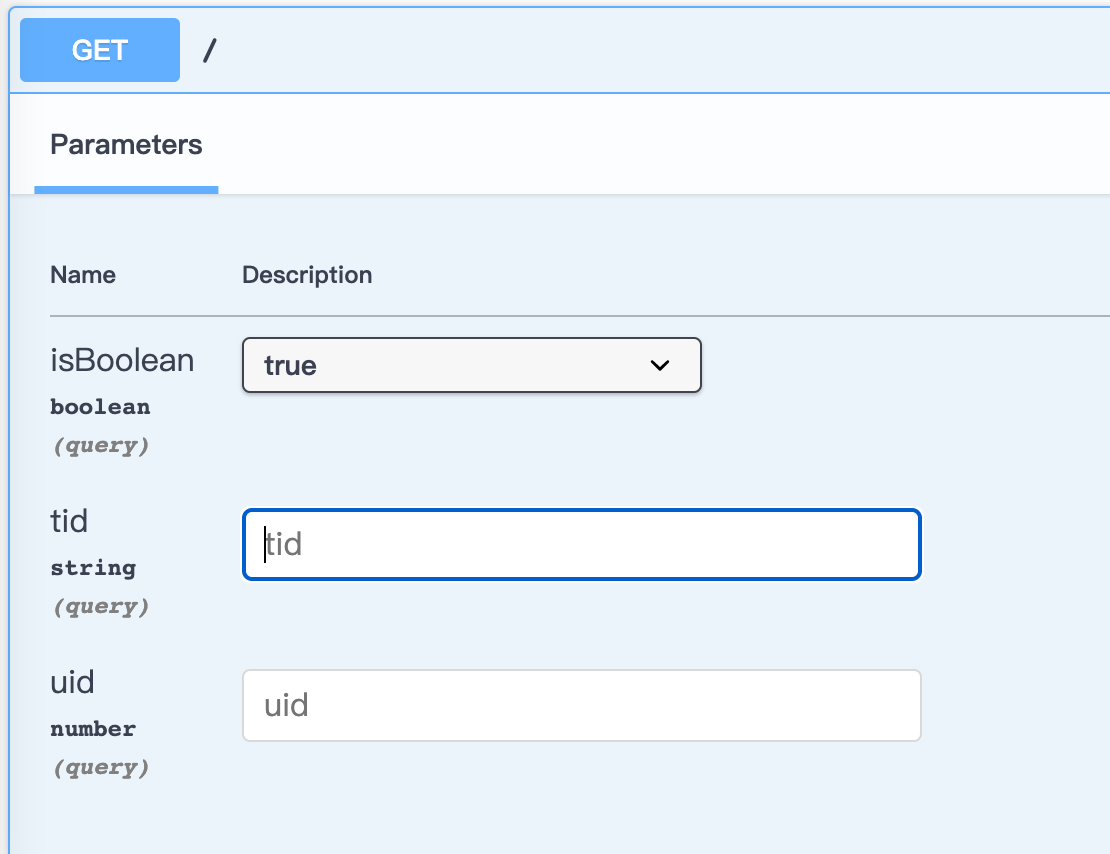
The Swagger component identifies the @Body(), @Query(), @Param() decorators for each routing method in each @Controller and extracts routing method parameters and types.
For example, the following code:
@Get('/')
async home (
  @Query('uid') uid: number
  @Query('tid') tid: string
  @Query('isBoolean') isBoolean: boolean
) {
    // ...
}
The basic Boolean, string, and numeric types are displayed as follows:
Types and schema
We often use objects in parameters and use defined classes as types. At this time, swagger components can also be automatically identified, and can also be combined with common types for identification.
For example, the following code:
@Post('/:id', { summary: 'test'})
async create(@Body() createCatDto: CreateCatDto, @Param('id') id: number) {
  // ...
}
The definition of CreateCatDto type is as follows. We use ApiProperty to define each attribute.
import { ApiProperty } from "@midwayjs/swagger";

export class CreateCatDto {
  @ApiProperty({ example: 'Kitty', description: 'The name of the Catname'})
  name: string;

  @ApiProperty({ example: '1', description: 'The name of the Catage'})
  age: number;

  @ApiProperty({ example: 'bbbb', description: 'The name of the Catbreed'})
  breed: string;
}
The effect is as follows. The component will automatically extract two of the parameters:
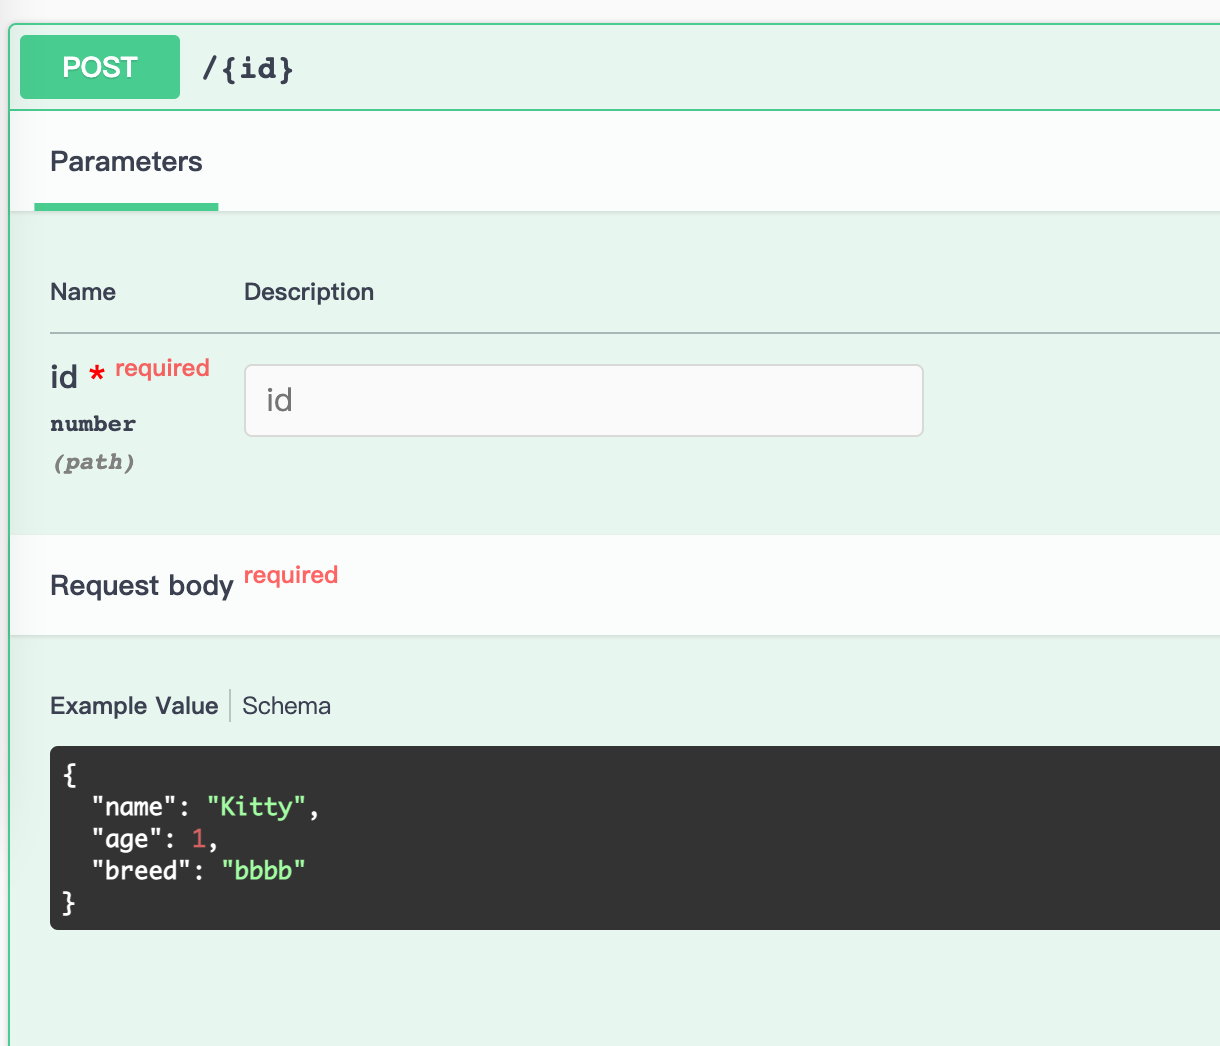
At the same time, since the example of each attribute is defined in the class, the sample value is automatically filled in.
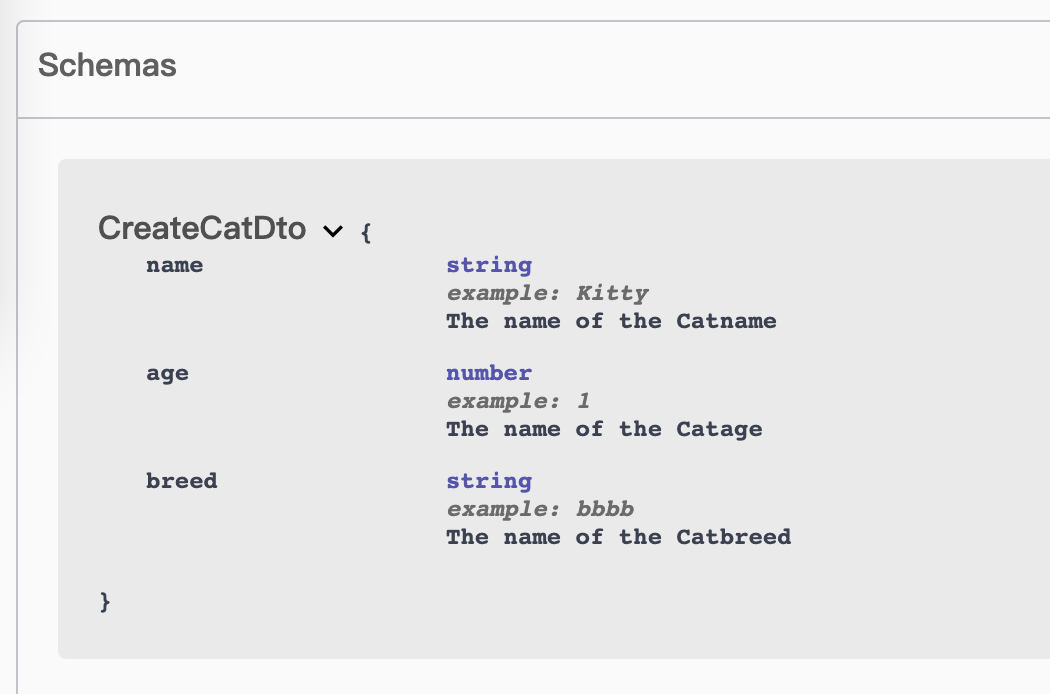
In Swagger, each type will be described by a Schema. We have already defined a CreateCatDto Schema, which looks like the following.
Note that we will reuse these Schemas.
Base type
We can define common types by setting type in the @ApiProperty(...) decorator.
In most cases, the underlying type can be automatically identified without explicitly declaring the type.
String
@ApiProperty({
  type: 'string',
  // ...
})
name: string;
Boolean
@ApiProperty({
  type: 'boolean',
  example: 'true',
  // ...
})
isPure: boolean;
Number Type
@ApiProperty({
  type: 'number',
  example: '1',
  description: 'The name of the Catage'
})
age: number;
In addition, you can also use the format field to define a more precise length.
@ApiProperty({
  type: 'integer',
  format: 'int32',
  example: '1',
  description: 'The name of the Catage'
})
age: number;
Array type
If the array type is an array type, you can configure the type field and use the type of the items to specify the type.
@ApiProperty({
  type: 'array',
  items: {
    type: 'string',
  },
  example: ['1']
  }
})
breeds: string[];
Enumeration type
If it is an enumeration type, it can be defined by configuring the enmu field.
enum HelloWorld {
  One = 'One',
  Two = 'Two',
  Three = 'Three',
}

@ApiProperty({
  enum: ['One', 'Two', 'Three']
  description: 'The name of the Catage'
})
hello: HelloWorld;
If the field is at the top level, the display effect is as follows:

Complex object types
If the type of a property is an existing complex type, you can use the type parameter to specify the complex type.
export class Cat {
  /**
   * The name of the Catcomment
   * @example Kitty
   */
  @ApiProperty({ example: 'Kitty', description: 'The name of the Cat'})
  name: string;

  @ApiProperty({ example: 1, description: 'The age of the Cat' })
  age: number;

  @ApiProperty({ example: '2022-12-12 11:11:11', description: 'The age of the CatDSate' })
  agedata?: Date;

  @ApiProperty({
    example: 'Maine Coon',
    description: 'The breed of the Cat',
  })
  breed: string;
}

export class CreateCatDto {

  // ...

  @ApiProperty({
    Type: Cat, // There is no need to specify example here.
  })
  related: Cat;
}
The effect is as follows:

Complex object array type
If the type of an attribute is a complex array type, the writing is slightly different.
Except that the type is declared as array, the items property only supports strings. You must use the getSchemaPath method to import a different type.
In addition, if the Cat type has not been declared in the type field of other attributes, you need to use the @ApiExtraModel decorator to declare additional external types.
import { ApiProperty, getSchemaPath, ApiExtraModel } from '@midwayjs/swagger';

class Cat {
  // ...
}

@ApiExtraModel(Cat)
export class CreateCatDto {
  // ...

  @ApiProperty({
    type: 'array',
    items: {
      $ref: getSchemaPath(Cat)
    }
  })
  relatedList: Cat[];
}
The effect is as follows:

Circular dependencies
When you have circular dependencies between classes, use lazy functions to provide type information.
For example looping over the type field.
class Photo {
  // ...
  @ApiProperty({
    type: () => Album
  })
  album: Album;
}
class Album {
  // ...
  @ApiProperty({
    type: () => Photo
  })
  photo: Photo;
}
getSchemaPath can also be used.
export class CreateCatDto {
  // ...

  @ApiProperty({
    type: 'array',
    items: {
      $ref: () => getSchemaPath(Cat)
    }
  })
  relatedList: Cat[];
}
Request definition
The paths defined by the OpenAPI are each routing path, and each routing path has the definition of HTTP methods, such as GET, POST, DELETE, PUT, etc.
Query definition
Use @ApiQuery to define Query data.
The @Query decorator is automatically identified.
@Get('/get_user')
async getUser(@Query('name') name: string) {
  return 'hello';
}
If @Query uses an object DTO, there are two options:
- Explicitly define fields with
@ApiProperty(traditional way) - Reuse
@midwayjs/validationDTO rules (@Rule) to infer fields automatically (enabled by default)
When auto inference is enabled (swagger.useValidationSchema = true, default), object Query DTO fields are expanded into multiple query parameters.
Current inference is based on validator adapters in @midwayjs/validation, supporting joi, zod, and class-validator.
export class UserDTO {
  @ApiProperty()
  name: string;
}

@Get('/get_user')
@ApiQuery({
  name: 'query'
})
async getUser(@Query() dto: UserDTO) {
  // ...
}
Body definition
Use @ApiBody to define Body data.
@Body object DTO supports the same two options:
- Explicitly define doc fields with
@ApiProperty - Infer fields from
@midwayjs/validationDTO rules automatically
When both exist, Swagger uses a merge strategy:
- Explicit
@ApiPropertymetadata has priority - Inferred validation metadata only fills missing fields (for example
required, basictype, etc.)
export class UserDTO {
  @ApiProperty()
  name: string;
}

@Post('/update_user')
async upateUser(@Body() dto: UserDTO) {
  // ...
}
For additional details, please use @ApiBody enhancement.
Note that Swagger stipulates that there can only be one Body definition. If @ApiBody is configured, the data extracted by the type will be automatically overwritten.
For example, in the following example, the type of Body will be replaced with Cat.
@ApiBody({
  type: Cat
})
async upateUser(@Body() dto: UserDTO) {
  // ...
}
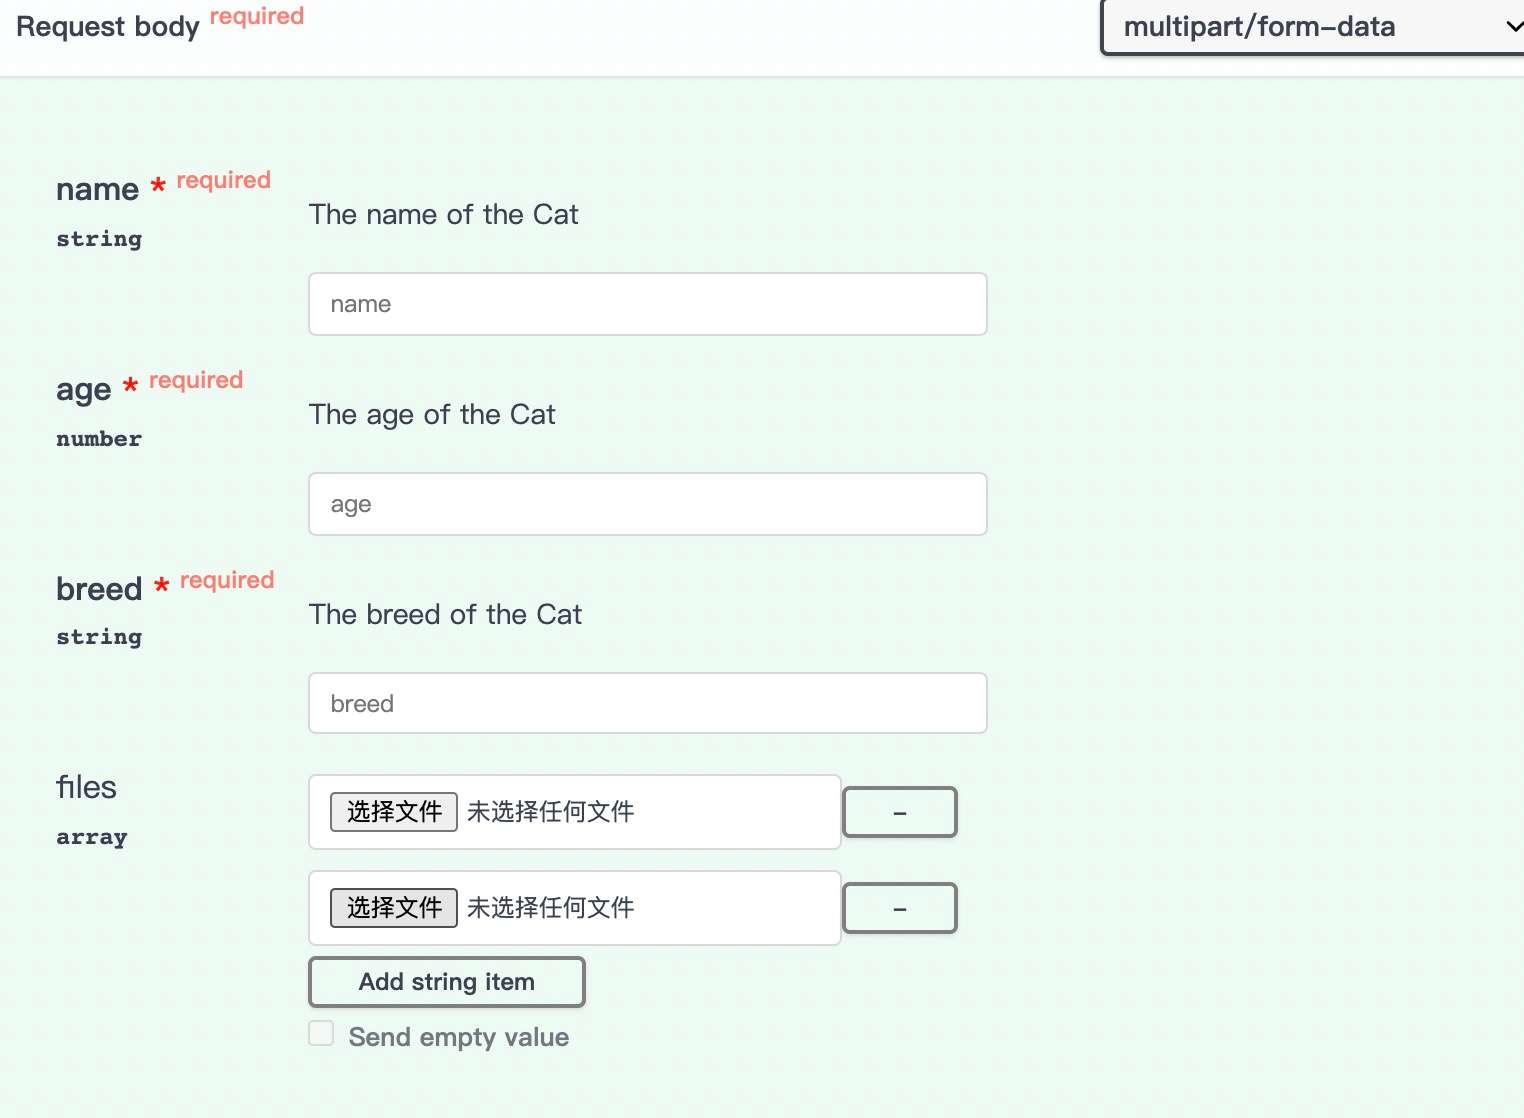
File upload definition
File upload is a special case in Post request.
You can implement multiple files and Fields types by defining properties in DTO.
import { ApiProperty, BodyContentType } from "@midwayjs/swagger";

export class CreateCatDto {
  // ...
  @ApiProperty({
    type: 'array',
    items: {
      type: 'string',
      format: 'binary',
    }
  })
  files: any;
}

// ...

@Post('/test1')
@ApiBody({
  contentType: BodyContentType.Multipart,
  schema: {
    type: CreateCatDto,
  }
})
async upload1(@Files() files, @Fields() fields) {
  // ...
}
The Swagger UI shows:
If you don't need multiple files, use schema definition.
export class CreateCatDto {
  // ...
  @ApiProperty({
    type: 'string',
    format: 'binary',
  })
  file: any;
}
The Swagger UI shows:

Request Header
The Header parameter is defined by the @ApiHeader({...}) decorator.
@ApiHeader({
  name: 'x-test-one',
  description: 'this is test one'
})
@ApiTags(['hello'])
@Controller('/hello')
export class HelloController {}
Request Response
@ApiResponse({...}) can be used to customize request Response.
@Get('/:id')
@ApiResponse({
  status: 200
  description: 'The found record',
  type: Cat
})
findOne(@Param('id') id: string, @Query('test') test: any): Cat {
  return this.catsService.findOne(+id);
}
Other decorators that do not require status are also available:
@ApiOkResponse()@ApiCreatedResponse()@ApiAcceptedResponse()@ApiNoContentResponse()@ApiMovedPermanentlyResponse()@ApiBadRequestResponse()@ApiUnauthorizedResponse()@ApiNotFoundResponse()@ApiForbiddenResponse()@ApiMethodNotAllowedResponse()@ApiNotAcceptableResponse()@ApiRequestTimeoutResponse()@ApiConflictResponse()@ApiTooManyRequestsResponse()@ApiGoneResponse()@ApiPayloadTooLargeResponse()@ApiUnsupportedMediaTypeResponse()@ApiUnprocessableEntityResponse()@ApiInternalServerErrorResponse()@ApiNotImplementedResponse()@ApiBadGatewayResponse()@ApiServiceUnavailableResponse()@ApiGatewayTimeoutResponse()@ApiDefaultResponse()
The response model can also be defined via type. For model fields, @ApiProperty is still recommended. If the same model also has @midwayjs/validation DTO rules, Swagger fills missing metadata according to the same merge strategy above.
import { ApiProperty } from '@midwayjs/swagger';

export class Cat {
  @ApiProperty({ example: 'Kitty', description: 'The name of the Cat'})
  name: string;

  @ApiProperty({ example: 1, description: 'The age of the Cat' })
  age: number;

  @ApiProperty({
    example: 'Maine Coon',
    description: 'The breed of the Cat',
  })
  breed: string;
}
Swagger also supports extended fields with the prefix x-, you can use the @ApiExtension(x-..., {...}) decorator.
@ApiExtension('x-hello', { hello: 'world' })
When you do not want to define the model type by type, we can add additional schema type descriptions by adding @ApiExtraModel to the Controller or Model Class.
@ApiExtraModel(TestExtraModel)
@Controller()
class HelloController {
  @Post('/:id', { summary: 'test'})
  @ApiResponse({
    status: 200
    content: {
      'application/json ': {
        schema: {
          properties: {
            data: { '$ref': getSchemaPath(TestExtraModel)}
          }
        }
      }
    }
  })
  async create(@Body() createCatDto: CreateCatDto, @Param('id') id: number): Promise<Cat> {
    return this.catsService.create(createCatDto);
  }
}

// or
@ApiExtraModel(TestExtraModel)
class TestModel {
  @ApiProperty({
    item: {
      $ref: getSchemaPath(TestExtraModel)
    },
    description: 'The name of the Catage'
  })
  one: TestExtraModel;
}
Generic returns data
The Swagger itself does not support generic data. As a type of Typescript, generics will be erased during the build period and cannot be read at runtime.
We can define it in some trick ways.
For example, we need to add some common package structure to the return value.
{
  code: 200,
  message: 'xxx',
  data: any
}
To do this, we can write a method where the input parameter is the returned data and returns a wrapped class.
import { Type } from '@midwayjs/swagger';

type Res<T> = {
  code: number;
  message: string;
  data: T;
}

export function SuccessWrapper<T>(ResourceCls: Type<T>): Type<Res<T>> {
  class Successed {
    @ApiProperty({ description: 'Status Code'})
    code: number;

    @ApiProperty({ description: 'message'})
    message: string;

    @ApiProperty({
      type: ResourceCls
    })
    data: T;
  }

  return Successed;
}
We can implement our own return class based on this method.
class ViewCat extends SuccessWrapper<Cat>(Cat) {}
When using, you can directly specify this class.
@Get('/:id')
@ApiResponse({
  status: 200
  description: 'The found record',
  type: ViewCat
})
async findOne(@Param('id') id: string, @Query('test') test: any): ViewCat {
  // ...
}
More definition examples
There are more ways to write in Swagger, and the framework supports them. For more usage, please refer to our test case.
Advanced usage
Route Tags
Swagger can add tags to each route for grouping.
There are two ways to add tags.
- Add to Controller
- @ApiTags and @ApiOperation
By default, the framework generates tags based on the Controller's path. For example, the following code will generate a hello tag, which will apply to all routes in this controller.
@Controller('/hello')
export class HelloController {}
If you need to customize the tags, you can use @ApiTags([...]) to customize the Controller tags.
@ApiTags(['hello'])
@Controller('/hello')
export class HelloController {}
Starting from v3.17.3, you can control whether to automatically generate Controller tags by configuring isGenerateTagForController.
// src/config/config.default.ts
export default {
  swagger: {
    isGenerateTagForController: false
  }
}
You can add @ApiTags directly to the route method.
// ...
export class HomeController {
  @ApiTags(['bbb'])
  @Get('/')
  async home(): Promise<string> {
    // ...
  }
}
You can also add tags through @ApiOperation.
// ...
export class HomeController {
  @ApiOperation({ tags: ['bbb'] })
  @Get('/')
  async home(): Promise<string> {
    // ...
  }
}
The priority of @ApiTags is higher than @ApiOperation. If both exist, @ApiTags will override @ApiOperation.
Similarly, @ApiTags on the route will also override @ApiTags on the controller.
You can add descriptions to Tags by configuring.
// src/config/config.default.ts

export default {
  swagger: {
    tags: [
      {
        name: 'api',
        description: 'API Document'
      },
      {
        name: 'hello',
        description: 'Other Router'
      },
    ]
  }
}
Authorization Verification
You can configure authentication methods by adding authorization configuration. We support basic, bearer, cookie, oauth2, apikey, and custom.
You can use the auth field to define the authentication type.
// src/config/config.default.ts
export default {
  // ...
  swagger: {
    auth: {
      authType: 'basic',
    },
  },
}
Supports array, configure multiple authentication types.
// src/config/config.default.ts
export default {
  // ...
  swagger: {
    auth: [
      {
        name: 'basicAuth1',
        authType: 'basic',
      },
      {
        name: 'basicAuth2',
        authType: 'basic',
      }
    ],
  },
}
basic
Enable basic authentication
// src/config/config.default.ts
export default {
  // ...
  swagger: {
    auth: {
      name: 'BasicAuth',
      authType: 'basic',
      description: 'Basic Auth',
    },
  },
}
Field description
| Field | Description |
|---|---|
| name | Optional, the key of the authentication field |
| authType | Must be 'basic' |
| description | Optional, for documentation (swagger-ui) |
| addSecurityRequirements | Optional, enable globally |
Take effect at the controller level.
@ApiBasicAuth()  // default uses 'basic' as the name
@Controller('/hello')
export class HelloController {}
Note: The @ApiBasicAuth() decorator has a default name 'basic'. If the name field in the configuration file is not 'basic', you need to explicitly specify the same name in the decorator:
// When the name in the config file is 'BasicAuth'
@ApiBasicAuth('BasicAuth')
@Controller('/hello')
export class HelloController {}
bearer
Enable bearer authentication (bearerFormat is JWT)
// src/config/config.default.ts
export default {
  // ...
  swagger: {
    auth: {
      name: 'BearerAuth',
      authType: 'bearer',
      description: 'Bearer Auth',
    },
  },
}
Field description
| Field | Description |
|---|---|
| name | Optional, the key of the authentication field |
| authType | Must be 'bearer' |
| bearerFormat | Optional, default is JWT |
| description | Optional, for documentation (swagger-ui) |
| addSecurityRequirements | Optional, enable globally |
Take effect at the controller level.
@ApiBearerAuth()  // default uses 'bearer' as the name
@Controller('/hello')
export class HelloController {}
Note: The @ApiBearerAuth() decorator has a default name 'bearer'. If the name field in the configuration file is not 'bearer', you need to explicitly specify the same name in the decorator:
// When the name in the config file is 'BearerAuth'
@ApiBearerAuth('BearerAuth')
@Controller('/hello')
export class HelloController {}
oauth2
OAuth2 is the most complex and powerful authentication type in OpenAPI. All authorization interaction flows can be described, and swagger-ui fully supports it automatically.
// src/config/config.default.ts
export default {
  // ...
  swagger: {
    auth: {
      name: 'testOAuth2',
      authType: 'oauth2',
      flows: {
        implicit: {
          authorizationUrl: 'http://example.org/api/oauth/dialog',
          scopes: {
            'write:pets': 'modify pets in your account',
            'read:pets': 'read your pets'
          }
        },
        authorizationCode: {
          authorizationUrl: 'https://example.com/api/oauth/dialog',
          tokenUrl: 'https://example.com/api/oauth/token',
          scopes: {
            'write:pets': 'modify pets in your account',
            'read:pets': 'read your pets'
          }
        },
      },
    },
  },
}
Field description
| Field | Description |
|---|---|
| name | Required, your API Key field name |
| authType | Must be 'oauth2' |
| flows | Required, four authorization modes |
| description | Optional, for documentation (swagger-ui) |
| addSecurityRequirements | Optional, enable globally |
flows is the most complex field configuration, including different parameters. Currently, mainly use authorizationCode and clientCredentials.
| Flow Type | Description | Scenario | Status |
|---|---|---|---|
| authorizationCode | Standard authorization code mode. User logs in via authorization server, then exchanges code for access token. Supports frontend+backend security. | Web apps, mobile apps (e.g. Google Login, GitHub OAuth). Modern mainstream. | ✅ Recommended (most secure, most general) |
| clientCredentials | Client credentials mode. No user involved, use client_id and client_secret to get token, machine-to-machine authentication. | Microservices, backend services, system integration, API gateway | ✅ Recommended (server-to-server) |
| password | Password mode. Use username and password to get token, skip authorization server. | Internal systems, testing, legacy. Risky, exposes password. | ��❌ Deprecated (RFC 6749 not recommended) |
| implicit | Implicit mode. SPA gets token in browser, no backend, designed to avoid exposing client_secret. | Early SPA, browser apps. Now replaced by authorizationCode + PKCE. | ❌ Deprecated (OAuth 2.1 removed) |
The available parameters for the above four Flow types are as follows:
| Parameter | Description | authorizationCode | clientCredentials | password | implicit |
|---|---|---|---|---|---|
| authorizationUrl | User authorization page URL | ✅ Required | ❌ None | ❌ None | ✅ Required |
| tokenUrl | Access token URL | ✅ Required | ✅ Required | ✅ Required | ❌ None |
| refreshUrl | Refresh token URL | ⚪ Optional | ⚪ Optional | ⚪ Optional | ⚪ Optional |
| scopes | Authorization scopes | ✅ Required | ✅ Required | ✅ Required | ✅ Required |
Take effect at the controller level.
@ApiOAuth2(['read:pets'])  // scopes must be specified, default uses 'oauth2' as the name
@Controller('/hello')
export class HelloController {}
Note: The @ApiOAuth2() decorator has a default name 'oauth2'. If the name field in the configuration file is not 'oauth2', you need to explicitly specify the same name in the decorator:
// When the name in the config file is 'testOAuth2'
@ApiOAuth2(['read:pets'], 'testOAuth2')
@Controller('/hello')
export class HelloController {}
cookie
Enable cookie authentication, which is implemented as apikey under the hood.
// src/config/config.default.ts
export default {
  // ...
  swagger: {
    auth: {
      authType: 'cookie',
      securityName: 'testforcookie',
      cookieName: 'connect.sid',
    },
  },
}
Field description
| Field | Description |
|---|---|
| securityName | Optional, the key of the authentication field |
| authType | Must be 'cookie' |
| cookieName | The key in the cookie |
| description | Optional, for documentation (swagger-ui) |
| addSecurityRequirements | Optional, enable globally |
Take effect at the controller level.
@ApiCookieAuth()  // default uses 'cookie' as the name
@Controller('/hello')
export class HelloController {}
Note: The @ApiCookieAuth() decorator has a default name 'cookie'. If the name field in the configuration file is not 'cookie', you need to explicitly specify the same name in the decorator:
// When the name in the config file is 'testforcookie'
@ApiCookieAuth('testforcookie')
@Controller('/hello')
export class HelloController {}
apikey
apiKey is the most flexible authentication mode in OpenAPI.
// src/config/config.default.ts
export default {
  // ...
  swagger: {
    auth: {
      name: 'x-api-key',
      authType: 'apikey',
      in: 'header',
      description: 'ApiKey Auth',
    },
  },
}
Field description
| Field | Description |
|---|---|
| name | Required, your API Key field name (header/query/cookie) |
| authType | Must be 'apikey' (lowercase) |
| in | Where the API Key is placed: header / query / cookie |
| description | Optional, for documentation (swagger-ui) |
| addSecurityRequirements | Optional, enable globally |
Take effect at the controller level.
@ApiSecurity('api_key')  // name must be specified, no default value
@Controller('/hello')
export class HelloController {}
Note: The @ApiSecurity() decorator must specify the name parameter, which should be consistent with the name field in the configuration file.
custom authentication
Custom authentication method, you need to design the parameter configuration yourself.
// src/config/config.default.ts
export default {
  // ...
  swagger: {
    auth: {
      authType: 'custom',
      name: 'mycustom',
      // ...
    },
  },
}
Take effect at the controller level.
@ApiSecurity('mycustom')
@Controller('/hello')
export class HelloController {}
Enable authentication globally
Usually, authentication is only enabled for specific routes. If you want to enable it globally, you can add the addSecurityRequirements property to an authentication method.
// src/config/config.default.ts
export default {
  // ...
  swagger: {
    auth: {
      name: 'BasicAuth',
      authType: 'basic',
      description: 'Basic Auth',
      addSecurityRequirements: true,
    },
  },
}
Ignore authentication
You can use @ApiExcludeSecurity to ignore authentication, supported on both class and method.
@Controller('/api')
@ApiSecurity('api_key')
class APIController {
  @Post('/update_user')
  async updateUser() {
    // ...
  }

  @Get('/get_user')
  @ApiExcludeSecurity()
  async getUser() {
    // ...
  }
}
Parameter configuration
Swagger components provide the same parameter configuration capability as the OpenAPI, which can be implemented through custom configuration.
The configuration items are as follows:
/**
 * see https://swagger.io/specification/
 */
export interface SwaggerOptions {
  /**
   * default value: My Project
   * https://swagger.io/specification/#info-object title field
   */
  title?: string;
  /**
   * default value: This is a swagger-ui for midwayjs project
   * https://swagger.io/specification/#info-object description field
   */
  description?: string;
  /**
   * Default value: 1.0.0
   * https://swagger.io/specification/#info-object version field
   */
  version?: string;
  /**
   * https://swagger.io/specification/#info-object contact field
   */
  contact?: ContactObject;
  /**
   * https://swagger.io/specification/#info-object license field
   */
  license?: LicenseObject;
  /**
   * https://swagger.io/specification/#info-object termsOfService field
   */
  termsOfService?: string;
  /**
   * https://swagger.io/specification/#openapi-object externalDocs field
   */
  externalDocs?: ExternalDocumentationObject;
  /**
   * https://swagger.io/specification/#openapi-object servers 字段
   */
  servers?: Array<ServerObject>;
  /**
   * https://swagger.io/specification/#openapi-object tags field
   */
  tags?: Array<TagObject>;
  /**
   * Please refer to the https://swagger.io/specification/#security-scheme-object
   */
  auth?: AuthOptions | AuthOptions[];
  /**
   * Default: /swagger-ui
   * path to access swagger ui
   */
  swaggerPath?: string;
  /**
   * ascii sorting route tags
   * You can use 1-xxx, 2-xxx, 3-xxx to define tag
   */
  tagSortable?: boolean;
  /**
   * Configuration Required in UI Display
   * Please refer to the https://github.com/swagger-api/swagger-ui/blob/master/docs/usage/configuration.md#display
   */
  displayOptions ?: {
    deepLinking?: boolean;
    displayOperationId?: boolean;
    defaultModelsExpandDepth?: number;
    defaultModelExpandDepth?: number;
    defaultModelRendering?: 'example' | 'model';
    displayRequestDuration?: boolean;
    docExpansion?: 'list' | 'full' | 'none';
    filter?: boolean | string;
    maxDisplayedTags?: number;
    showExtensions?: boolean;
    showCommonExtensions?: boolean;
    useUnsafeMarkdown?: boolean;
    tryItOutEnabled?: boolean;
  };

  documentOptions?: {
    /**
     * Custom operationIdFactory for generating operationId
     * @default () => controllerKey_webRouter.methodKey
     */
    operationIdFactory?: (
      controllerKey: string,
      webRouter: RouterOption
    ) => string;
  };
  /**
   * default: true
   * Whether to reuse @midwayjs/validation DTO metadata to infer Schema
   */
  useValidationSchema?: boolean;
}
/**
 * Inherited from https://swagger.io/specification/#security-scheme-object
 */
export interface AuthOptions extends Omit<SecuritySchemeObject, 'type'> {
  /**
   * Type of verification right
   * basic => http basic verification
   * bear => http jwt verification
   * cookie => cookie verification
   * oauth2 => use oauth2
   * apikey => apiKey
   * custom => custom type
   */
  authType: AuthType;
  /**
   * https://swagger.io/specification/#security-scheme-object type field
   */
  type?: SecuritySchemeType;
  /**
   * authType = cookie can be modified by ApiCookie the name associated with the decorator
   */
  securityName?: string;
  /**
   * authType = cookie can be modified, cookie name
   */
  cookieName?: string;
}
Decorator list
All decorators of the component refer to the design of @nestjs/swagger and are prefixed with Api. All decorators are listed here:
| Decorator | Support mode |
|---|---|
@ApiBody | Method |
@ApiExcludeEndpoint | Method |
@ApiExcludeController | Controller |
@ApiHeader | Controller/Method |
@ApiHeaders | Controller/Method |
@ApiOperation | Method |
@ApiProperty | Model Property |
@ApiPropertyOptional | Model Property |
@ApiResponseProperty | Model Property |
@ApiQuery | Method |
@ApiResponse | Method |
@ApiTags | Controller/Method |
@ApiExtension | Method |
@ApiBasicAuth | Controller |
@ApiBearerAuth | Controller |
@ApiCookieAuth | Controller |
@ApiOAuth2 | Controller |
@ApiSecurity | Controller |
@ApiExcludeSecurity | Method |
@ApiParam | Method |
@ApiExtraModel | Controller |
UI rendering
Rendering from Swagger-ui-dist
By default, if the swagger-ui-dist package is installed, the component will call renderSwaggerUIDist to render swagger ui by default. If you need to pass the options of swagger-ui, you can pass the swaggerUIRenderOptions option.
// src/config/config.default.ts
import { renderSwaggerUIDist } from '@midwayjs/swagger';

export default {
   // ...
   swagger: {
     swaggerUIRender: renderSwaggerUIDist,
     swaggerUIRenderOptions: {
       // ...
     }
   },
}
If you want to adjust the UI configuration, you can replace the default swagger-initializer.js with a custom file.
// src/config/config.default.ts
import { AppInfo } from '@midwayjs/core';
import { renderSwaggerUIDist } from '@midwayjs/swagger';
import { join } from 'path';

export default (appInfo: AppInfo) {
   return {
     // ...
     swagger: {
       swaggerUIRender: renderSwaggerUIDist,
       swaggerUIRenderOptions: {
         customInitializer: join(appInfo.appDir, 'resource/swagger-initializer.js'),
       }
     },
   }
}
The content of the customized swagger-initializer.js is roughly as follows:
window.onload = function() {
   window.ui = SwaggerUIBundle({
     url: "/index.json",
     dom_id: '#swagger-ui',
     deepLinking: true,
     presets: [
       SwaggerUIBundle.presets.apis,
       SwaggerUIStandalonePreset
     ],
     plugins: [
       SwaggerUIBundle.plugins.DownloadUrl
     ],
     layout: "StandaloneLayout",
     persistAuthorization: true,
   });
};
The url points to the current swagger json and can be modified by yourself. For the complete swagger-ui configuration, please refer to [here](https://github.com/swagger-api/swagger-ui/blob/master/docs/usage /configuration.md).
Rendering from CDN addresses such as unpkg
If the swagger-ui-dist package is not installed, the renderSwaggerUIRemote method is automatically used for rendering, and the cdn resource is provided by unpkg.com by default.
// src/config/config.default.ts
import { renderSwaggerUIRemote } from '@midwayjs/swagger';

export default {
   // ...
   swagger: {
     swaggerUIRender: renderSwaggerUIRemote,
     swaggerUIRenderOptions: {
       // ...
     }
   },
}
Only Swagger JSON is provided
If you only want to provide Swagger JSON, you can configure renderJSON to only render JSON without introducing the swagger-ui-dist package.
// src/config/config.default.ts
import { renderJSON } from '@midwayjs/swagger';

export default {
   // ...
   swagger: {
     swaggerUIRender: renderJSON,
   },
}
Frequently Asked Questions
summary or description in route annotations such as @Get do not take effect
When there is an @ApiOperation, the summary or description in the @ApiOperation will be used first, so you only need to write one in routing annotations such as @ApiOperation and @Get.